Sunday, May 29, 2016

Installing android playstore on a "custom" pad

My problem  :

  • I have a pad with custom OS, based on android 4.2.2
  • I do not have th play store installed 
  • I want one ! :-)

Disclaimer

WARNING all this post constains informations that works for me.
  • I download and do many things that could be risky...
  • I don't know if my donwload are safe or not 
  • I don't know if the command line I does will work and if they are safe (probably not cause I change credentials on /system....)
So if you reproduce this "receip" be aware that's at your own risk!
At least does a back up and save all your things... (if it's not done regularly)

The target

Install some file (apk) in /system/app :
  • GoogleServicesFramework.apk
  • OneTimeInitializer.apk
  • GoogleLoginService.apk
  • GoogleFeedback.apk
  • Phonesky.apk

Get those files

I download a zip for gapp (google application), it 's name like :gapps-jb-20130812-signed.   
I Download this one cause it's for the android 4.2.2 (the one that is serving for my device customization ).
Download those file as "pack", give me a coherent files association (compatible).
So, unzip then search the desired files, we will use them after adb install.

Install adb

ADB is an acronym for Android Driver Bridge : this piece of software allos you to take control of your device from you PC.

I  download  a file adb-setup-1.4.3
see http://forum.xda-developers.com/showthread.php?p=48915118#post48915118
for more explanation.

I try first to install "adb driver" but with win10 I had  problem with peripheral installation because the system (win 10)  enables driver signature enforcement by default. I try this but finally install " adb-setup"

Push those file

WARNING : see disclaimer chapter.
push each file using this adb comman line :
adb push GoogleServicesFramework.apk /system/app

repeat this for all files. Previously I transfer those apk to the device then click on each and try to install , but this not  work (GoogleServicesFramework.apk does not install at all...)
If you have a fail due to Read-only file system you have to :
use adb shell in a win10 administrator command line tool :
adb shell
then you have adb sheel (#)
# su
# mount -o,rw remount /system/app

At the end

I restart my device and all is working. I can now have access to android store.

Thursday, March 31, 2016

Java Graph visualization and EMF


The begining

I'm actually working in a integration test team. The main goal of this team is to make software parts assembly ant then test them in a nominal to limit way.
To acheive this task they build data :  for input, result validation  and non-regression test data. This team work with (space) flight dynamics algorithm and the manipulated data are
  • numerous
  • have to make a consistent whole
These datas are in fact organized as a graph and a tree view does not always fit to validate/control these data...

One solution : a graph view

We work with an EMF (Eclipse Modeling Framework) data implementation. So I start reusing a generic editor  (based on a reflexive item provider, the source could be found here) and adapt it to fit our needs. But I feel that is not enough to validate, saw data.
At this point I remembered my work on  graph database named OrientDb. This tool has a graph editor and it was cool to see cross references ans so on...
So I searched a java graph visualization tool. I found fast JUNG (Java Universal Network/Graph Framework) that fit my "first order" needs :
  • easily managed graph
  • many provided layout (see KKlayout, FRLayout, SpringLayout, CirculeLayout and more...)

Usage

 The usage is quite easy, JUNG provide a sample project that is very usefull and run quite well.

Eclipse view Integration

My integration is actually very direct. I use  :
  • the AWT_SWT eclipse bridge to integrate visualisation in a view
  • a command in the generic editor popup menu to invoke an handler that call  the refresh and the show graph view.
  • rely on reflexive content provider to build the graph
  • set a color for each datatype (we have about 1000)
TODO Png

Next

  • More integration to allow highlight from generic editor to graph view and opposite
  • set a short name for vertices and tool tip for contents
  • set edge view depending of containment or not
  • Optimize memory usage (actually no more than one hundred vertices... due to sharing memory with eclipse ? )


Friday, February 5, 2016

Building a small Arduino powered robot

It's time to play Arduino and Motor Shield

I received many weeks ago enough part to build a small arduino robot, and I have nos the time. Let's build it...

For this project I have no real objective. I just want to asseble an autonomous robot, avoiding wall or other object.

The parts

  • Arduino uno for control-command
  • Seeed motor shield V2 for power and simplifaction of command
  • An HC-SR04 ultra-sonic sensor for objects detection
  • A 9g servo motor for ultra sonic sensor rotation
  • battery  clip connector 9v to 2,1 power plug (see here to build or buy )
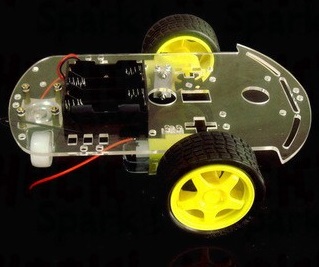
  • a chassi 2wd motor, with bolts and nuts, wheel, two small DC motor, a four battery pack AAA some wires and an end wheel
 

The assembly

Nothing very important to say here. Try to assemble, see what goes wrong, re assemble , what goes wrong and so on.


The only thing to say is that I make parts work separately first :
  • the HC-SR04 ultra-sonic sensor
  • then the servo 
  • then the motor shield
 And finally integrate. And at this point it does not work...  as usual ...
  • Motor shield use pin 8 to  13 to work 
  • AND servo (library) disable PWM for 9 and 10 pin

So it does not work. The solution is to change the pin mapping in motor shield libraries from 9,10 to 5,6 and connect them physicaly (not shown on this picture).
I saw this on a blog here. It works for me too ,but if you  try, you try at your own risks.

Servo

Library used : arduino  Servo
#include "Servo.h"
const int SERVO_CMD = 14;
void setup() {
     myServo.attach(SERVO_CMD);
}

and
myServo.write(angle);

MotorShield (Seeed v2)

Library used : seeed MotorDriver modified in  MotorDriver56 to use pwm 5,6 in place of 9 and 10

include "MotorDriver56.h"
void setup() {
      motordriver.init();
      motordriver.setSpeed(200,MOTORB);
      motordriver.setSpeed(200,MOTORA);
}
and
motordriver.goForward();
motordriver.goBackward();
motordriver.goLeft();
motordriver.goRight();
motordriver.stop();

typical use

motordriver.go${Action}();
delay(time);
motordriver.stop();

HC-SR04

use
   const int trigPin = 4;
   const int echoPin = 7;

and
   int calculateDistance(){ 
      digitalWrite(trigPin, LOW); 
      delayMicroseconds(2);
      // Sets the trigPin on HIGH state for 10 micro seconds
      digitalWrite(trigPin, HIGH);
      delayMicroseconds(10);
      digitalWrite(trigPin, LOW);

     // Reads the echoPin, returns the sound wave travel time in microseconds
      duration = pulseIn(echoPin, HIGH); 
      int distance = duration*0.034/2;
      return distance;
    }

The basic control / command


if (nothing front) {
   goFront()
} else if ( something left ) {
   goBackward()
   goRight()
} else {
   goBackward() 
   goLeft()
}

But ...

My small rover does not go straightaway.  The reasons ... motor are differents, the end wheel is not so good. Those two points cause deviations.

Next improvment 

  • the tail whell cause trajectory deviation. Need to change to a round ball, or use chains
  • add encoder measurement to have a better distance/movement  estimation
  • there's no sensor at back (securing goBackward() ) 
  • Use arduino interrupt

Ultimate goal

Transform this rover into sensor. I mean acquire distance measurement, send it via ESP8266 (wifi) to raspberry Pi.  And finally build a 3D map of the rover context.

Monday, February 1, 2016

Stream, Image processing,Java 8 and parallel

During last few days I decide to go further with Java 8 stream, lambda. As I currently work on differents projects set to Java 5 compatibility I does not have a lot of "material" for experiment.

Learn

So I began, as usual with google to find out example and/or tutorial.
I mainly found cases of studies starting with simple list, applying mapping, filtering and finally reducing.

Those examples are very usefull and well explain and were helpfull as starting point :

Apply

Now it time to try ourself.  I do not want to work with case of studies beacause I want to think about about the solution and find myself how solve with stream a given problem. And, I want to make something (I hope) usefull (almost for me...).
So which example ? A long time a ago, I worked on image processing, segmentation, morphology transformation,  skeletonisation, hough transform,  on color (TLS, RVB), gray level or binary images.
An image is a good client for my streaming example :
  • could be usefull
  • could be enough big to see parallel effect
  • you  could easily imagine how to apply a structuring element on an image stream

Imagine the stream

As I want to apply a structuring element 3x3, 5x5, nxn I think about :
  1. walking on a stream  of vectors building from original image. Those vectors has the same dimension as the structuring element.
  2. iterate on an Integer Stream of (height x width) of image for limit, that allow to build the target image
I give up the first solution beacause :
  • the memory foot print is four time the image size for a 3x3 kernel. 3 for stream + 1 for target.
  • the time for stream building is in excess and depend of the kernel size.

Stream coding

To do the second solution I have to :
  • iterate on a range [0 , heigh * width]
  • for each calculate the value resulting of kernel application
  • put it in the the resulting image.
I found to two way to implement this :

IntStream.range(0, (heigh * width)-1).forEach(n->{applyKernel(n)})
or
Stream.iterate(0, n -> n+1).limit(heigh * width) - 1).forEach(n-> {applyKernel(n)})

The applyKernel(int n) method is for  the target pixel resulting of kernel application ( for the pixel n)

To find the right way to implement,  I saw result time for the same image, the same number of time in the same machine, excluding the worst 2 cases for each. The winner is the first solution with 880 ms compare with 1000ms.

Why?  I think It's because IntStream is provide for this purpose exactly -ie providing an int range. Unlike Stream.iterate() with (plus) limit() is done to generate a stream by applying the given function on the seed. It's something that is more sophisticated. Another point could be that the limit method produce another stream(). So at the end I think there is more "mechanics" in the second solution that implie less speed.

Processing image

In this example to process image I
  • load it as a BufferedImage
  • convert it to gray (byte) 
  • filter it with an octagonal 
  • convert it to binary relying on DataBufferByte
  • 2 closing (dilate x 2 then erode x 2)
  • then edge detection 

Load image

File imageFile = ... 
BufferedImage img = ImageIO.read(imageFile);

Convert to byte gray

BufferedImage  grayImg= new BufferedImage(widht, heigh, BufferedImage.TYPE_BYTE_GRAY);
BufferedImageOp gsOp = new ColorConvertOp(
          imageToConvert.getColorModel().getColorSpace(),
          grayImg.getColorModel().getColorSpace(),null);
gsOp.filter(imageToConvert, grayImg);

Filter with Octagon kernel

It is the application of this kernel
|1,1,1|
|1,1,1|  divide by 9
|1,1,1|

It means that the resulting pixel is the average of  itself and the 8 pixels around it.
To do that I use the
byte[] imageAsByteArray =  ((DataBufferByte)image.getRaster().getDataBuffer()).getData();

Convert to binary

It means  iterate on gray scale byte[] and set resulting pixel to 0 or 255 depending of the imput value.
If the imput value is more than a threshold  the valur will be 255 else 0.

Closing

for erosion and dilatation I use a CROSS kernel
|false,true,false|
|true ,true, true|  
|false,true,false|

For dilatation I apply this  on binary image (255 is true, 0 is false) if the kernel application (logical OR) on the given image contexte return true then the result is 255 , 0 otherwhise.
For erosion this is the same kernel but the application use a logical AND.

The closing operator effect is filling small hole in image. The hole size fill up depend of the kernel size an the number of succesive erosion, dilatation.

Edge detection

On binary image I apply the laplacian square using multiplication.
|0, 1,0|
|1,-4, 1|  
|0, 1,0|

Stream and parallel

Now it's time to test parallel feature. I red a lot of bad thing about parallel but it seems that all those "problems" always appear in concurrent enviromnent. See :

The big deal is that stream allows nows to acheive those easily/instantly without need to use Thread or other framework, just add .parallel() and you got it.
How to use it in my example. I just do like that :


IntStream.range(0, (heigh * width)-1).parallel().forEach(n->{applyKernel(n)})

If you want to control the number of thread use (see here for more informations) :

ForkJoinPool forkJoinPool = new forkJoinPool(4);
... 
forkJoinPool.submit(() -> 
IntStream.range(0, (heigh * width)-1).parallel().forEach(n->{applyKernel(n)})
).get()

At the end the time is cut by 2 going from 880 ms to 430 ms to does erosion.
So nice and easy. So is there any problems around there ?

Well as I understand problem could come from :

Conclusion

I have now a better understanding on Java stream pro and cons.  Enough to think about Stream the next time I face an analoguoud context.
Sunday, January 3, 2016

Experiencing Spring boot for REST, WAR and few things

This work has for starting point the need to build war because we don't manage installation on the target server. So it is more easy in our context to ask for one tomcat installation for many web app rather than many standalone app.So we have to transform a spring boot stand alone product in war.
As usal the spring boot guys implement this feature.

The target deployment

The access url

This product product has multiple instance on the same tomcat deployed on different context root.
Just changing the war name like this

${context_root_name}#myWarName.war 

The application setup

  • change log target
  • many product instance means many RDBMS instances to (in our case) we have to change properties files

Few words on product

This product is built on micro services architecture approach. A big  word to tell that we want to define many small and independant services :
  • independant means with their own execution context and data managment
  • interoperability relying on "neutral/pivot" data exchange format  (JSON) and communication API (HTTP) : Here we uses spring REST (hateos).
this product is one of our micro service that collaborate with many other product :
  • jenkins (REST API)
  • a wiki (manly consumer)
  • maven (client API) 
  • a configuration server API for register and provide communication end point for each participant

Hateoas  and data storage with spring

More than rewrite Spring tutorial, I give you the pointers Building REST services with Spring, and
 Accessing JPA Data with REST

Protect deployment behavior

We don't have a lot of time to automate the deployment yet. Whe could do that in the near future with  ansible, fabric, salt or simply simple script because we don't have full admin rights on this machine. I have also in mind to see if we could use Karaf with many servlet container instances.
Anyway, at the begining we choose to product safe war (that are no able to connect to RDBMS) deploy manually . We have only two environements to deploy and they are not really enough stable to spend time in automation now)  To does that whe add the following in maven pom to remove the propertie file that sets up the application :


<plugin>
    <groupId>org.apache.maven.plugins</groupId>
    <artifactId>maven-antrun-plugin</artifactId>
    <executions>
        <execution>
            <id>package</id>
            <phase>package</phase>
            <configuration>
                <target>
                    <unzip
                        src="target/${project.artifactId}-${project.version}
                            .${project.packaging}"
                        dest="target/excludeProps/" />
                    <delete
                        file="target/excludeProps/WEB-INF/classes/
                            application.properties" />
                    <delete file="target/excludeProps/WEB-INF/
                            classes/logback.xml" />
                    <zip
                        destfile="target/${project.artifactId}-
                            ${project.version}_SAFE.${project.packaging}"
                        basedir="target/excludeProps" encoding="UTF-8" />
                    <delete dir="target/excludeProps" />
                </target>
            </configuration>
            <goals>
                <goal>run</goal>
            </goals>
        </execution>
    </executions>
</plugin>

Build the war

first I used the 58.2 spring boot doc... but no chance,  nothing work.
Then after googling I add spring-webmvc to make things work properly and then it works

<dependency>
 <groupid>org.springframework</groupid>
 <artifactid>spring-webmvc</artifactid>
</dependency>

provide test resources 

How does I test rest and controller ?
One solution is to use Spring test Stack :
  • @RunWith(SpringJUnit4ClassRunner.class) and @SpringApplicationConfiguration(classes =...) This uses the custom extension of BlockJUnit4ClassRunner which provides functionality of the Spring TestContext 
  •  @WebIntegrationTest({ "server.port=0", "management.port=0" }) wich provide a complete startup of application (http listening on port)
  • @ActiveProfiles("test") point the properties setup for tests (use  : application-test.properties)
  • Use  MockMvc see Introducing Spring Test MVC HtmlUnit

 So we have

@RunWith(SpringJUnit4ClassRunner.class
@SpringApplicationConfiguration(classes = Application.class) 
@WebIntegrationTest({ "server.port=0", "management.port=0" })
@ActiveProfiles("test")
public class EnvControllerTest {

} 

Then we declare our mock variable, wrap my web application context and a JPA repository :
private MockMvc mockMvc;


@Autowired
private WebApplicationContext webApplicationContext;

@Autowired
EnvRepository aRepository;

Then I can setup up my test with mock initialization and then repository setup
@Before
public void setup() throws Exception {
 this.mockMvc = MockMvcBuilders.webAppContextSetup(webApplicationContext).build();
 this.aRepository.deleteAll();
 //init repositories...
}

At the end I could now use the mock calling URL, get response and verify it.

@Test
 public void aNewTest() throws Exception {
 ResultActions perform = mockMvc.perform(get("/restpath/1"));
 MvcResult andReturn = perform.andReturn();
 String res = andReturn.getResponse().getContentAsString();
}

Manage http error

A last small thing that test make thougt about... error processing managment.
import org.springframework.http.HttpStatus;
import org.springframework.web.bind.annotation.ResponseStatus;

@ResponseStatus(HttpStatus.INTERNAL_SERVER_ERROR)
public class ErrorServerException extends RuntimeException {
    private static final long serialVersionUID = -4464650477685224460L;

    public ErrorServerException(String message) {
        super("Server error : " + message + ".");
    }
}

Saturday, December 19, 2015

How to change Heading size in blogger (h3, h4, h5)

If you want to change heading sub heading style

Edit the template :

then search "body {"
and finish by add before body style styles you want for h2, h3, h4  :
/* Content
----------------------------------------------- */
.post-body h2{font-size:30px!important;background:grey;color:white;
text-shadow:0px 0px 2px black;}

.post-body h3{font-size:20px !important;background:grey;color:white;
text-shadow:0px 0px 2px black;}

.post-body h4{font-size:15px !important;background:#ebebe0;color:black} 
body {
  font: $(body.font); ...


Thank you very much to the source :
http://www.alltechbuzz.net/add-custom-designed-subeadingh3-minor-headingh4-tags/

Adding some more info 
  • if try to change h2 does not work add !important
  • if try to change size for h3 does not work does the same

If you want to use firebug for CSS exploration

add in "template" then, "customize" then,  "advanced" and finally "add CSS" add (temporaly or not...)

.blogger-clickTrap{
display:none!important;
}
This will allow you to see style of your different item and then change them.

Friday, December 11, 2015

Playing with Arduino, HC-SR04, servo, DC motor, motor shield, ESP8266 and basic robotic platform


Well all is said in the title.... I red a lot about all this piece and finally  I decide to get them and start play with...

So let see the different element


Aduino R3 
for the control part hosting command software

Seed studio motor shield
for DC motor control

HC-SR04 sensor (x3) + servo
  • to avoid collision mount on servo
  • to avoid to drop down
  • to see above
ESP8266 
for wifi comunication

HC-SR04 tests

to be able to use it :
1 : donwload and install the arduino "new ping library". See https://bitbucket.org/teckel12/arduino-new-ping/wiki/Home#!download-install and try the different examples.
2 : you could try to this very fun tutorial using processing software http://howtomechatronics.com/projects/arduino-radar/

After this test in face the fact that my micro servo is not very acurate so I have to find a new one.

Seed studio motor shield + Basic platform tests

To be done

ESP8266 tests 

To be done